 listicle
Recessed Lighting Installation Cost Per Fixture 2026
Table of Contents
- Recessed Lighting Installation Cost Per Fixture 2026: Quick Comparison
- Key Factors That Influence Your Installation Price
- Recessed Lighting Permit Requirements: What Homeowners Need to Know
- Recessed Lighting Layout Design Tips for Better Results
- Cost of Retrofitting Recessed Lights vs. New Construction
- DIY vs. Professional Installation: What You Should Know
- Conclusion
- Frequently Asked Questions
Last Updated: September 16, 2026
Recessed Lighting Installation Cost Per Fixture 2026: Quick Comparison
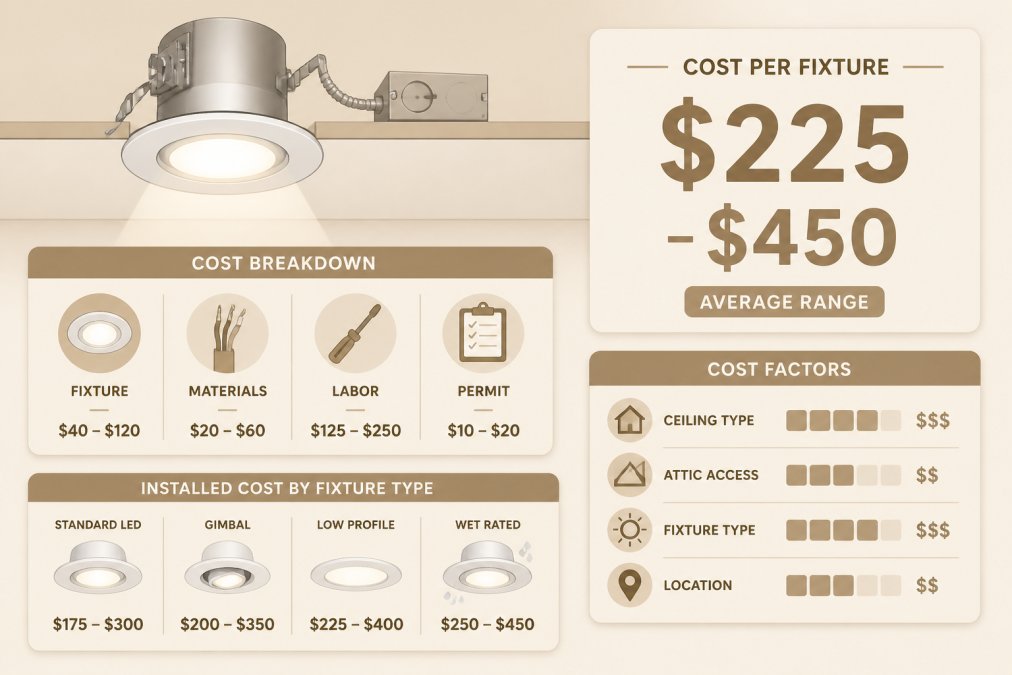
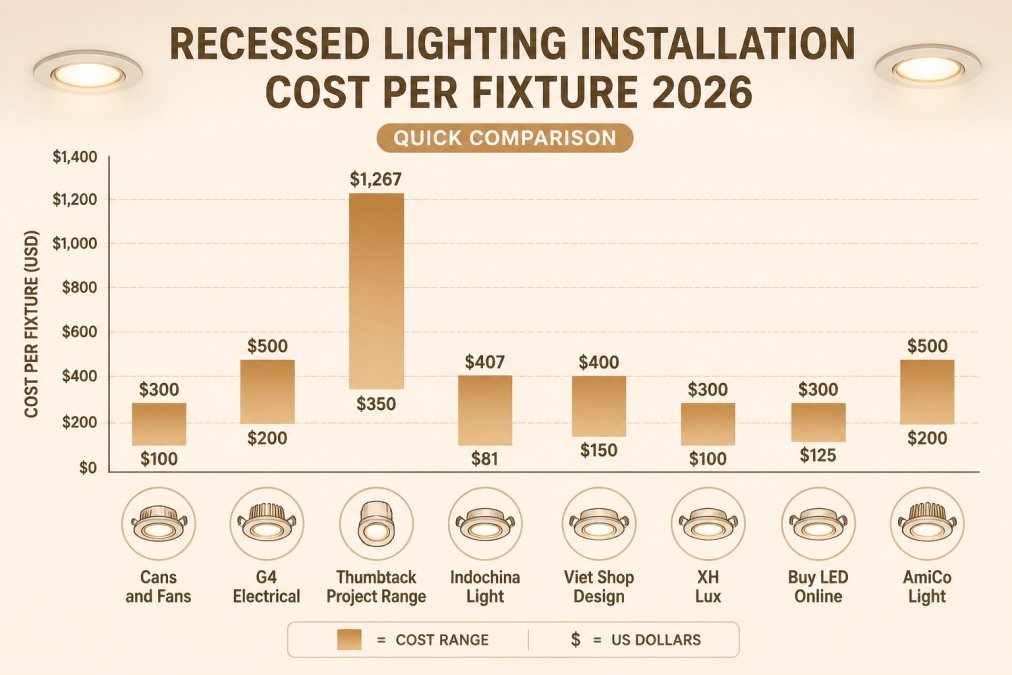
This guide breaks down what drives the cost of recessed lighting installation and how to plan a project that passes inspection the first time.
| Installation Scenario | Typical Cost Per Fixture | Best For |
|---|---|---|
| Remodel with attic access | $100 - $250 | Single-story homes, open attic |
| Remodel, no attic access | $200 - $400 | Two-story homes, finished ceilings |
| New construction | $75 - $200 | Open framing, pre-drywall phase |
| Retrofitting existing cans | $50 - $150 | Swapping old housings for LED |
Key Factors That Influence Your Installation Price
The national average hides enormous regional and structural variation. Labor rates, ceiling construction, and existing wiring capacity move the final number more than fixture selection does.
Ceiling Type and Accessibility
Attic access is the great cost divider. With access from above, a fixture might take 20 minutes. Under a finished second-floor ceiling, the work involves cutting drywall, fishing wire through enclosed joist bays, and patching, drywall repair alone adds real cost per opening.
Consider the difference between these ceiling conditions:
- Open attic above: fastest install, lowest labor
- Finished ceiling, no access: drywall cuts, patching, and paint touch-up required
- Insulated ceilings: requires insulation-contact (IC) rated or airtight housings
- Vaulted or cathedral ceilings: depth clearance problems rule out standard housings
Wiring and Circuit Load
Your existing electrical system determines whether this is a simple fixture swap or a panel project. Each recessed light draws a small load, but a room full of them adds up.
A few things push wiring costs up:
- No existing junction box near the new fixture location
- Circuit already near capacity, requiring a new dedicated run
- Aluminum wiring or older two-wire systems without a ground
- Dimmer switch upgrades, especially for LED-compatible dimming
Recessed Lighting Permit Requirements: What Homeowners Need to Know
Recessed lighting permit requirements vary by jurisdiction, but most areas require a permit when new circuits are run, existing wiring is modified, or a panel is touched. Simple fixture swaps reusing existing wiring sometimes qualify as minor work, confirm with your local building department.
What typically triggers a permit:
- Running new circuits from the panel
- Adding a new breaker or upgrading the panel
- Modifying existing wiring inside walls
- Any work in a kitchen or bathroom with specific code requirements
What usually doesn't:
- Replacing a failed fixture with an identical one on the same wiring
- Swapping a trim or bulb
Recessed Lighting Layout Design Tips for Better Results
Good recessed lighting layout design tips start with one rule: light the surfaces and tasks, not the floor beneath each fixture. Spacing, beam angle, and fixture count determine whether a room feels evenly lit or dotted with harsh pools of light.
Layout decisions you'll make before installation:
- Spacing: a common starting point is to space fixtures roughly half the ceiling height apart, then adjust for the room
- Distance from walls: keep fixtures a consistent distance in from the perimeter to avoid scalloping on the wall
- Task zones: cluster fixtures over counters, islands, and reading areas rather than spacing them uniformly
- Trim style: baffle trims cut glare, reflectors push more light down, and gimbal trims aim light at art or angled surfaces
- Color temperature: 2700K for warm living spaces, 3000K to 4000K for kitchens and workspaces, kept consistent within a room
Cost of Retrofitting Recessed Lights vs. New Construction
Retrofitting recessed lights usually costs less per fixture than new construction because the wiring path and ceiling structure already exist. New construction costs less than a finished-ceiling remodel because there's no drywall to cut or patch. The finished remodel sits in the middle, and it's the most common scenario homeowners face.
Canless Wafer Lights vs. Traditional Housing Cans
A traditional recessed can is a metal housing, typically 4", 5", or 6", mounted to a joist or bar hanger, holding a screw-in lamp or LED retrofit insert. The housing is the expensive, labor-heavy part and needs 5.5" to 7.5" of cavity clearance.
That difference drives the cost math:
Get your free electrical estimate →
| Retrofit Type | Typical Cost Per Fixture | Ceiling Cut | Cavity Depth Needed | Best For |
|---|---|---|---|---|
| Swap trim/bulb in existing can | $15 - $60 | None | Existing housing | Cosmetic refresh |
| LED retrofit insert in existing can | $40 - $120 | None | Existing housing | Efficiency upgrade |
| Canless wafer, new opening | $125 - $300 | 4" or 6" hole saw | ~1" behind drywall | Remodels, shallow ceilings |
| New traditional housing, finished ceiling | $200 - $450 | 6" to 8" hole | 5.5"+ clearance | Vaulted or deep cavities |
When Traditional Housings Still Win
Canless wafers are not universally better. Traditional housings still make sense when:
- You need IC-rated or airtight housings in an insulated ceiling. Many wafer lights are IC-rated, but the housing format gives you more options for insulation-contact and airtight assemblies in cold-climate attics.
- You want a specific trim aesthetic. Baffle, reflector, wall-wash, and gimbal trims are more widely available in traditional housing formats, and some designers still prefer the look.
- You're matching existing cans. Mixing wafer and can formats in the same ceiling creates visible inconsistencies in trim depth and beam pattern.
- You need a shallow remodel housing. A "remodel can" is a traditional housing designed to install through a finished ceiling without attic access, it clips to the drywall rather than a bar hanger. It costs more than a wafer but preserves the traditional look.
New Construction Installations
New construction is the cheapest time to install recessed lighting, full stop. With framing exposed, electricians run wire along open joists and mount housings or wafer junction boxes directly, and the drywall crew closes up afterward, no patching, paint matching, or fishing wire.
DIY vs. Professional Installation: What You Should Know
DIY recessed lighting makes sense only in narrow cases: swapping an existing fixture on the same circuit, where no permit is required, with wiring you fully understand. For new circuits, panel work, or finished-ceiling cuts, professional installation is safer and often cheaper once you account for mistakes.
Where DIY goes wrong:
- Code compliance: work that doesn't meet the adopted electrical code fails inspection and can void insurance coverage
- Circuit load errors: overloading a circuit causes nuisance tripping and, in the worst case, a fire hazard
- Hidden damage: fishing wire through finished walls without the right tools damages structure and insulation
- Resale problems: unpermitted work becomes a disclosure issue when you sell
Where DIY genuinely works:
- Replacing a failed fixture with an identical one
- Swapping trims or upgrading bulbs to LED
- Adding a fixture in an open-attic location on an existing, adequately sized circuit
The Cost Nobody Quotes: Long-Term Ownership
Three long-term cost drivers matter:
1. Driver and LED module failure. Integrated LED fixtures, including most canless wafers, have a sealed driver and LED board. When the driver fails, you replace the whole fixture or driver module, not a bulb. Electricians commonly report driver failure between year 5 and year 10 on lower-tier fixtures, while name-brand fixtures with a 5-year warranty tend to outlast it.
A Rough 10-Year Cost-of-Ownership Sketch
For a 10-fixture kitchen project, the ownership math looks roughly like this:
| Line Item | DIY Swap (Existing Cans) | Pro Install (New Canless Wafers) |
|---|---|---|
| Upfront per fixture | $15 - $60 | $125 - $300 |
| 10-fixture upfront | $150 - $600 | $1,250 - $3,000 |
| Expected driver/module failures over 10 yrs | Low (replaceable lamps) | 1 - 3 fixtures on budget product |
| Replacement cost per failure | $5 - $15 lamp | $25 - $90 fixture |
| Warranty on labor | None | Typically 1 year |
| Permit and inspection | Usually none | Included |
| Approach | Best For | Main Risk | Permit Handling |
|---|---|---|---|
| DIY fixture swap | Existing wiring, same circuit | Code compliance | Usually none required |
| DIY new install | Open attic, simple circuit | Circuit overload | Often required, easy to miss |
| Professional install | New circuits, finished ceilings | None if licensed | Handled by contractor |
Conclusion
Getting recessed lighting installation cost right in 2026 comes down to planning before the first hole is cut. The per-fixture number is only the starting point; ceiling access, circuit capacity, permits, and layout determine what you actually pay. A quote ignoring those factors isn't a bargain, it's an incomplete estimate waiting to grow.
Frequently Asked Questions
How much do electricians charge per fixture for recessed lighting installation in 2026?
Labor rates for recessed lighting vary by market and project complexity. For an accurate figure in Southwest Florida, request a free estimate from a licensed electrician who can assess your ceiling type, wiring, and layout.
Are there additional permit fees for recessed lighting installation?
Yes. Most jurisdictions require an electrical permit when adding new circuits or hardwiring fixtures, and the fee is separate from labor and materials. Permit costs vary by municipality based on project scope and number of fixtures. A licensed contractor handles the application and schedules the inspection. Skipping the permit can lead to failed inspections, fines, and complications when selling your home, so always confirm local requirements before work begins.
How does the cost of retrofitting recessed lights compare to new construction installation?
Retrofitting into an existing ceiling typically costs more per fixture than new construction because it involves cutting drywall, navigating ceiling joists, and repairing finishes. New construction installations are simpler since wiring runs are exposed before drywall goes up.
What factors influence the labor cost for installing recessed lighting?
Labor cost depends on ceiling height and material, attic or crawlspace access, whether new wiring or a junction box is needed, circuit capacity, and the number of fixtures. Insulation contact (IC) rated and airtight housings may be required in insulated ceilings. Dimmer switch installation and smart home integration add time. Layout complexity, such as vaulted ceilings or tight spacing, also raises labor. A site visit gives the most accurate quote.
How many recessed lights do I need for a 12x12 kitchen?
A common guideline is to divide the ceiling area by four, which suggests roughly nine fixtures for a 12x12 kitchen. However, layout design matters more than a simple formula. Consider task areas like counters and sinks, and aim for even spacing, typically 3 to 4 feet apart. Use 4-inch or 6-inch LED wafer lights with 800 to 1,100 lumens each. A lighting designer can tailor the plan to your kitchen's layout and color temperature preferences.