 how-to
How to Install Smart Lighting for Homeowners
Table of Contents
- Start Here: Smart Lighting Basics for Homeowners
- Smart Bulb vs Smart Switch Installation: Which Path Fits Your Home?
- Tools Needed for Electrical Lighting Upgrades
- Step 1: Safety First - Turning Off Power at the Circuit Breaker
- Step 2: Removing Existing Fixtures and Checking Compatibility
- Step 3: Installing Your Smart Bulbs or Smart Switches
- Step 4: Connecting to Wi-Fi, Hubs, and Setting Up the App
- How Long Does It Take to Install Smart Lighting?
- Frequently Asked Questions
Last Updated: October 4, 2026
Start Here: Smart Lighting Basics for Homeowners
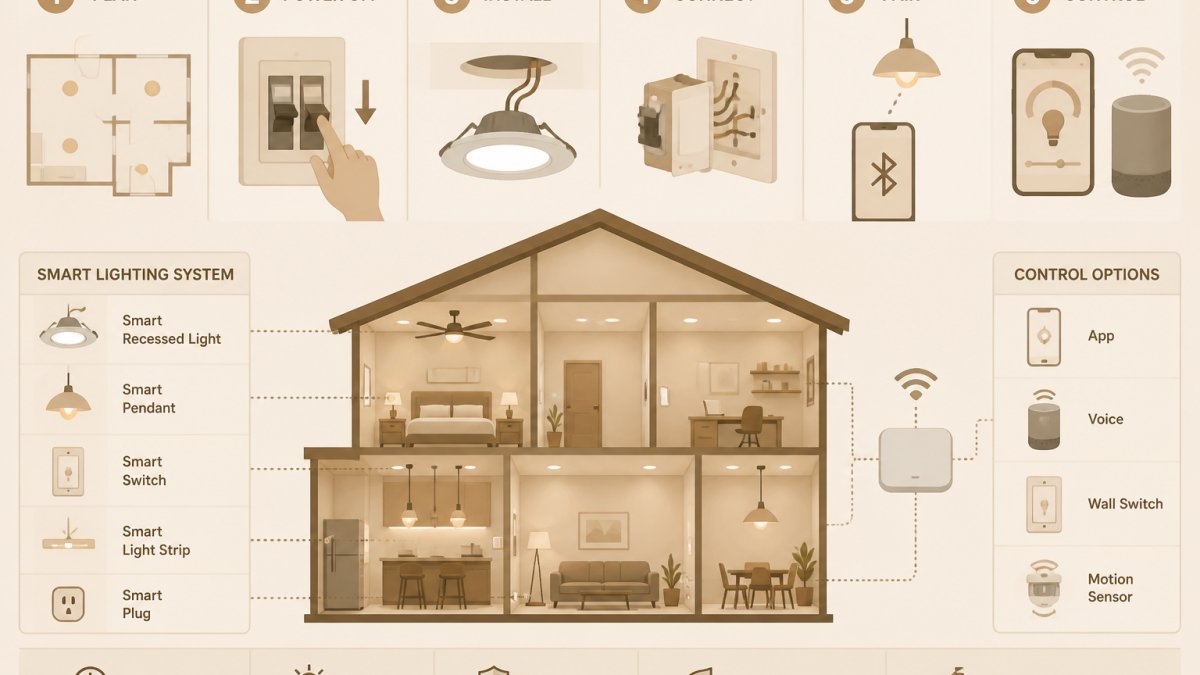
Learning how to install smart lighting for homeowners starts with one choice: swap the bulbs or replace the switch.
The easiest install is not always the right one. A smart bulb takes two minutes; a smart switch takes an afternoon and possibly an electrician.
Below, we break down the full process, from killing power at the breaker to naming devices on the app.
Smart Bulb vs Smart Switch Installation: Which Path Fits Your Home?
Smart bulbs win for renters and simple setups. Smart switches win when you want every fixture in a room to respond to one wall control. The answer depends on two things most guides never separate: your wiring and your wireless protocol.
Start with the wiring question
Smart switches usually need a neutral wire in the box, and many older homes do not have one.
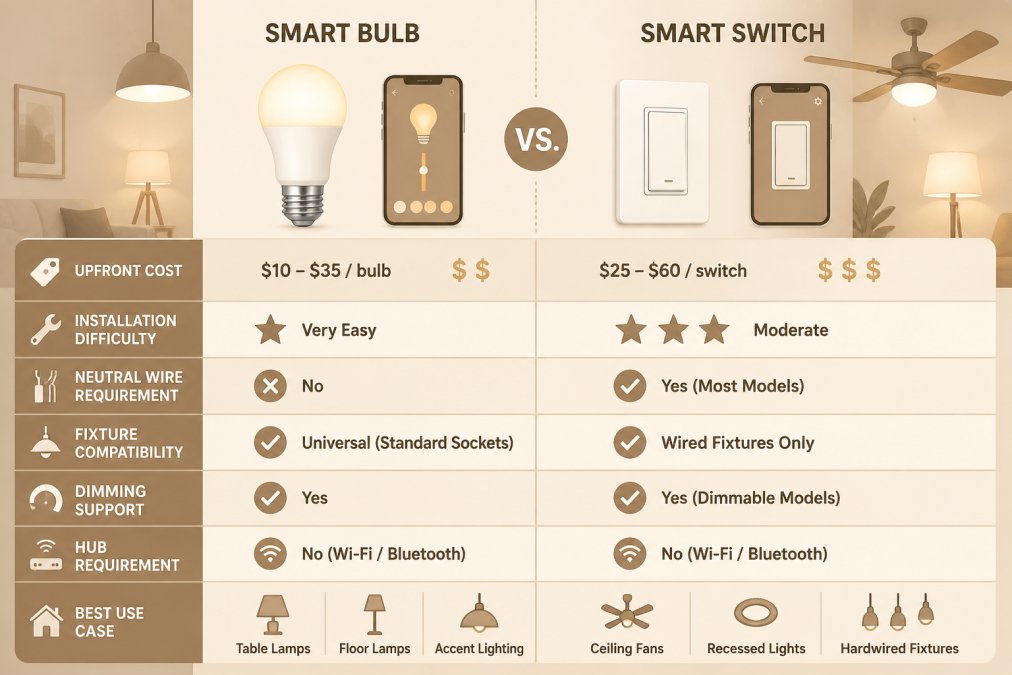
Here is how the two paths compare:
| Factor | Smart Bulb | Smart Switch |
|---|---|---|
| Upfront cost | Lower per bulb | Higher per switch |
| Install difficulty | Easy, no wiring | Moderate, wiring required |
| Neutral wire needed | No | Usually yes |
| Works with existing fixtures | Yes | Yes |
| Supports dimming | Bulb dependent | Switch dependent |
| Hub required | Sometimes | Sometimes |
| Best use case | Renters, single lamps | Whole-room control |
A common mistake is buying smart switches before checking the box. Pull the cover plate: a bundle of white wires capped together usually means you have a neutral. If not, plan for bulbs or call an electrician.
Then pick a protocol before you pick a brand
Wi-Fi. The device connects directly to your router, no hub, simple setup, cheapest entry point.
Zigbee. A low-power mesh protocol where each device repeats for the others, so the network strengthens as you add lights.
Z-Wave. Also a low-power mesh, but on a different frequency than Zigbee.
Thread and Matter. Thread is a newer low-power mesh protocol, and Matter is an interoperability standard layered on top of it (and on Wi-Fi).
Here is the practical rule most installers use:
- One or two rooms, simple setup: Wi-Fi bulbs are fine. No hub, no extra cost.
- Whole home, 15-plus devices: Zigbee or Z-Wave with a hub. Your Wi-Fi network stays clean and the mesh gets more reliable as you add lights.
- Building now, planning ahead: Look for Matter-certified devices so you are not locked into one ecosystem.
Match the switch to the bulb, not just the socket
If you go the smart switch route, the switch and bulb must agree on dimming. A switch rated for LED loads dims an LED bulb smoothly; one rated only for incandescent loads may cause flicker, buzzing, or dropouts. Check the minimum load rating too, some smart dimmers need at least 10 to 15 watts, so a single 8-watt LED bulb may not be enough.
The decision in one line
If you rent, or want one lamp on at sunset, buy a Wi-Fi smart bulb. If you own the home and want every ceiling light in a room on one wall control, check for a neutral wire, then buy a smart switch on Zigbee, Z-Wave, or Matter with a matching hub.
Tools Needed for Electrical Lighting Upgrades
You need fewer tools than you think. A basic kit covers most jobs:
- Non-contact voltage tester
- Flathead and Phillips screwdrivers
- Wire strippers
- Needle-nose pliers
- Electrical tape
The voltage tester is non-negotiable, it confirms the power is off before you touch a wire. For smart switches, add a wire nut assortment and possibly a short grounding wire.
Step 1: Safety First - Turning Off Power at the Circuit Breaker
Turn off the correct breaker before you do anything else:
- Go to your main electrical panel.
- Find the breaker labeled for the room or circuit.
- Flip it to the OFF position.
- Walk back to the switch or fixture.
- Test with a non-contact voltage tester.
- Confirm zero voltage before proceeding.
If your panel is not labeled, turn off the main breaker and work in daylight, slower, but safe.
Electrical code in most jurisdictions requires that you work on de-energized circuits. The Occupational Safety and Health Administration electrical safety guidance treats live-circuit work as a last resort, not a shortcut.
If your breaker keeps tripping after you flip it back on, that is a separate problem. Stop and call a licensed electrician.
Step 2: Removing Existing Fixtures and Checking Compatibility
Remove the old fixture or switch carefully, then check what you are working with. Compatibility is where most installs stall.
For a bulb swap, unscrew the old bulb and check the socket type. Most fixtures use standard E26 bases.
For a switch swap, you will need to:
- Turn off power at the breaker.
- Remove the cover plate.
- Unscrew the switch from the box.
- Pull it forward gently.
- Photograph the wiring.
- Label each wire with tape.
Now check for a neutral wire. Smart switches need it to power their radio.
Check your fixture's wattage and voltage rating too.
Step 3: Installing Your Smart Bulbs or Smart Switches
Installation is quick once the prep is done.
Get your free electrical estimate →
For smart bulbs:
- Screw the bulb into the socket.
- Turn the power back on at the breaker.
- Flip the wall switch to ON and leave it on.
- Open the manufacturer app and start pairing.
For smart switches:
- Confirm power is off at the breaker.
- Connect the ground wire first.
- Connect the neutral wire to the switch's neutral terminal.
- Connect the line and load wires.
- Secure the switch to the box.
- Replace the cover plate.
- Restore power and test.
If the switch controls a dimmable light, make sure the smart switch is rated as dimmable and matches your bulb type, mixing an LED bulb with an older dimmer causes flicker or buzzing.
If you are not comfortable working inside a switch box, this is the point to call a licensed electrician. Light Life Electric handles smart switch installs across Southwest Florida, from permits to final inspection.
Step 4: Connecting to Wi-Fi, Hubs, and Setting Up the App
Connection is where smart lighting either feels magic or feels broken. Most issues come down to Wi-Fi frequency, band steering, and network segmentation, and most guides stop at "download the app."
The pairing sequence that actually works
- Download the manufacturer's mobile application.
- Create an account and verify your email.
- Put the device in pairing mode, usually by cycling power or holding a button.
- Let the app scan for the device.
- Enter your Wi-Fi password.
- Name the device clearly, like "Kitchen Ceiling" not "Light 1."
Why 2.4 GHz keeps failing (and how to fix it)
Most smart bulbs and switches only connect on 2.4 GHz, not 5 GHz, that band travels farther and penetrates walls better, which is why low-power IoT radios use it. The problem: many routers ship with band steering on, broadcasting one network name for both bands and quietly pushing devices to 5 GHz.
Three fixes, in order of preference:
- Split the SSIDs. In your router settings, give the 2.4 GHz and 5 GHz networks different names (for example,
HomeNetandHomeNet-5G). Connect your phone to the 2.4 GHz network during setup, then move it back. - Temporarily disable band steering during pairing, then re-enable it.
- Use the app's "compatibility mode" if it has one. Some manufacturer apps force a 2.4 GHz handshake.
If pairing still fails, the device may be stuck in pairing mode from a previous attempt. Power-cycle it at the breaker or socket, wait 30 seconds, and try again.
Hubs, bridges, and why they help at scale
A hub creates a separate low-power network (Zigbee, Z-Wave, or Thread) your lights talk to instead of your router. That keeps dozens of devices off Wi-Fi and lets the mesh grow stronger as you add lights. Above about 15 smart devices, a hub is worth the hardware; for two bulbs, it is not.
Security and privacy: the step most guides skip
Every smart bulb, switch, and plug is a small computer on your network. The Federal Trade Commission guidance on securing smart home devices treats connected devices as endpoints that need patching, and the same logic applies to lighting.
Here is a practical setup that takes about 20 minutes and covers the vast majority of home risk:
1. Put smart devices on a separate network. Most modern routers support a guest network. Put every smart bulb, switch, plug, and hub on the guest SSID, keeping phones and laptops on the main network. If a bulb is compromised, it cannot reach your personal devices.
2. Change the router's admin password. The default admin password on a router is public information.
3. Use WPA3 or WPA2-AES. Older WPA and WEP encryption are broken.
**4.
6. Review app permissions. A lighting app does not need access to your contacts or location history.
7. Use unique passwords. Do not reuse your email password on a smart lighting account.
Automations, scenes, and voice control
Once connected, set up automation and scenes: group lights by room, create morning and evening scenes, schedule porch and security lights, and enable geofencing so lights respond when you arrive or leave. Voice control works through a voice assistant once the app and assistant are linked. Remote access routes through the manufacturer's cloud, so treat that account like your email.
How Long Does It Take to Install Smart Lighting?
A smart bulb takes about two minutes.
Here is a realistic time estimate:
| Task | Time Estimate |
|---|---|
| Single smart bulb | 2-5 minutes |
| Multiple smart bulbs, one room | 15-30 minutes |
| Single smart switch (neutral present) | 30-60 minutes |
| Single smart switch (no neutral) | 1-2 hours or call an electrician |
| App setup and naming | 10-20 minutes |
| Automations and scenes | 15-30 minutes |
| Hub setup | 20-40 minutes |
Troubleshooting adds time. If a device will not pair, the usual culprits are Wi-Fi frequency, weak signal, or a device stuck in pairing mode.
Smart lighting upgrades should make your home safer and easier to run, not add a weekend of frustration.
Light Life Electric is a family-owned, Florida certified electrical contractor serving Southwest Florida.
Frequently Asked Questions
Do I need a hub to install smart lighting in my home?
Most Wi-Fi smart bulbs and switches connect directly to your home network without a hub. You only need a hub or bridge if you choose Zigbee or Z-Wave devices, or if you want to unify multiple brands under one app. For a simple setup with a few bulbs, Wi-Fi is usually the easiest path.
Can you put a smart bulb in any light fixture?
Smart bulbs fit standard E26 or E12 sockets, which covers most table lamps, ceiling fixtures, and recessed cans. Check the fixture's maximum wattage rating and whether it traps heat, since some smart bulbs run warmer than standard LEDs. Enclosed fixtures may shorten bulb life, so verify the bulb is rated for enclosed use before installing.
What is the difference between smart bulbs and smart switches?
Smart bulbs replace the bulb and control light individually through an app, which is ideal for renters or rooms without a neutral wire. Smart switches replace the wall switch and control the entire circuit, so they work with your existing bulbs and keep physical wall control. Switches typically require a neutral wire and a bit more wiring skill to install.
How do I put a smart bulb in pairing mode?
Most smart bulbs enter pairing mode automatically the first time you power them on, or after you toggle the wall switch off and on two to three times in quick succession. Check your bulb's manual for the exact sequence, since some models use a dedicated button or a longer toggle pattern. Once the bulb blinks, open the app and add a new device.