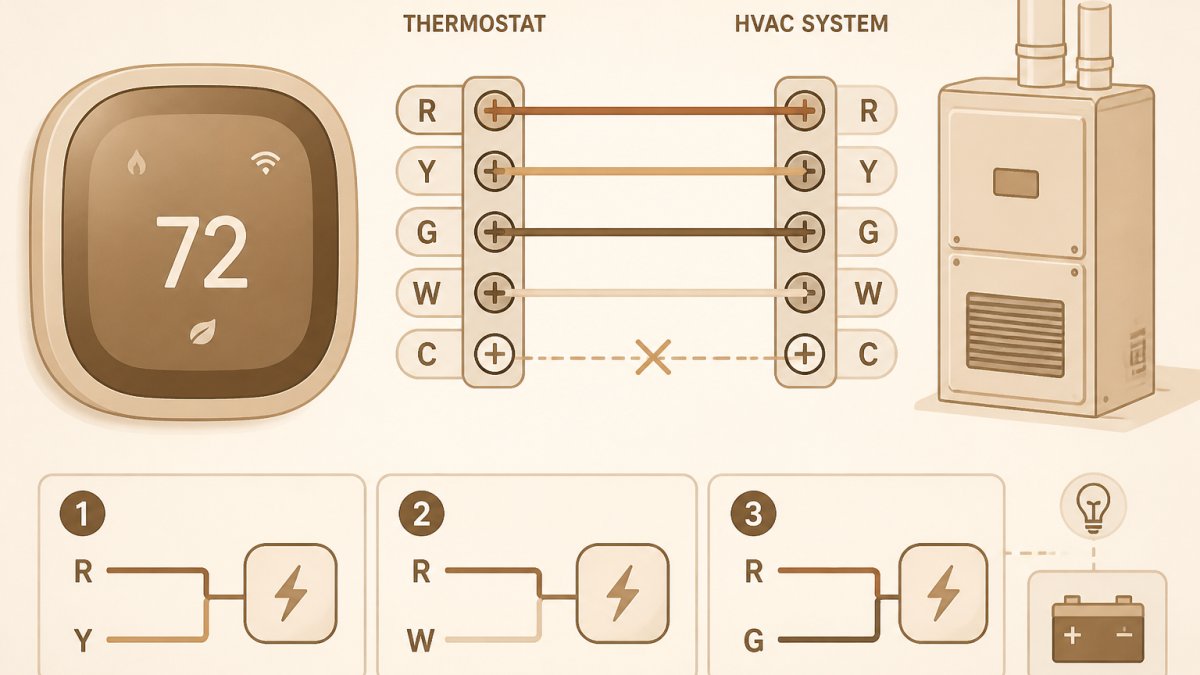
 how-to
How to Wire a Smart Thermostat Without a C Wire
Table of Contents
- What You'll Need Before You Start
- How to Identify Thermostat Wires
- C-Wire Adapter Installation: Step-by-Step
- Repurposing an Unused Wire as a C Wire
- System Compatibility and Wiring Diagrams
- When to Call for Professional Thermostat Installation Services
- Troubleshooting and Safety After Installation
- Frequently Asked Questions
Last Updated: September 27, 2026
What You'll Need Before You Start
Smart thermostat wiring without a C wire is possible, and most homeowners can do it with the right tools and a clear plan. The C wire, or common wire, gives your thermostat continuous power. Without it, many smart models will not work at all.
Gather these tools first:
- Screwdriver set (flathead and Phillips)
- UL Solutions guide to electrical safety for safe work practices
- Multimeter for voltage testing
- Wire strippers
- Smartphone camera (to photograph wiring)
- The thermostat's installation manual
How to Identify Thermostat Wires
Identifying your thermostat wires is the first real step, and it takes about ten minutes. Turn off power at the circuit breaker, then remove the old thermostat from its baseplate.
- R or RH: 24V power
- W: Heat
- Y: Cooling
- G: Fan
- C: Common wire (24V return)
Reading Terminal Labels
Terminal labels tell you what each wire does. Write down every wire and its color before you disconnect anything. Wire color coding is not universal, so trust the labels, not the colors.
Using a Multimeter to Test Voltage
A multimeter confirms which wire carries power. Set it to AC voltage in the 20-50V range.
C-Wire Adapter Installation: Step-by-Step
A C-wire adapter (often sold as a power extension kit) solves the missing-wire problem without running new cable through your walls. The adapter mounts at your furnace or air handler control board and sends continuous 24V power to the thermostat over the existing wires. Most kits include the adapter module, a short wiring harness, and a resistor or jumper set for power-stealing thermostats.
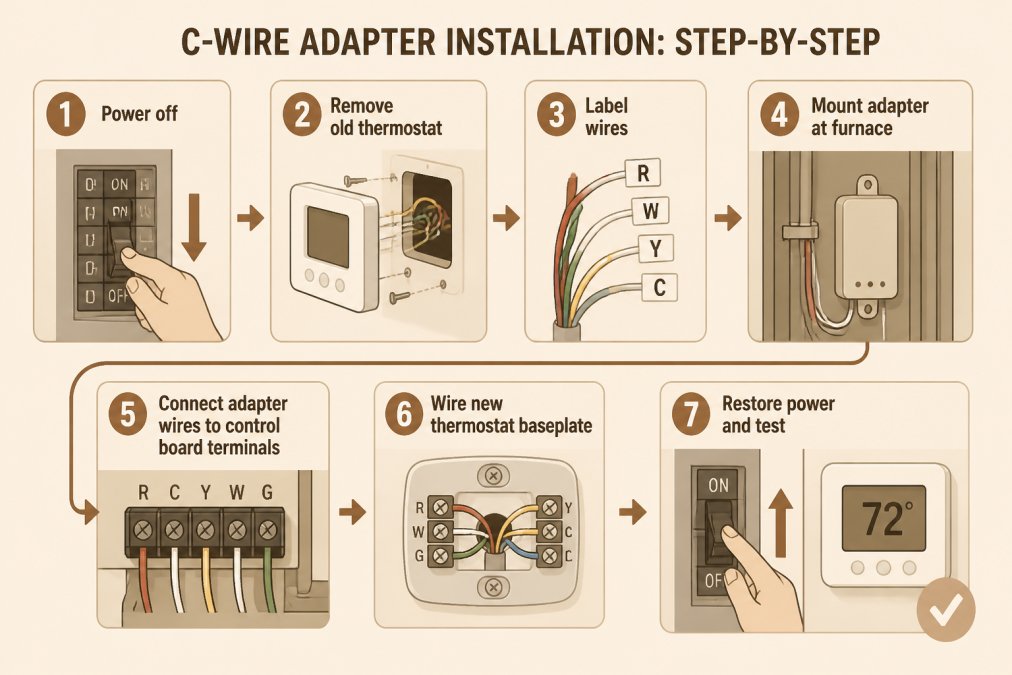
Step 1: Shut Off Power at the Circuit Breaker
Turn off the breaker that feeds your HVAC system. Flip the furnace service switch too, and confirm power is off with a non-contact voltage tester before touching any wires. The 24V transformer on the control board is the component most often damaged by live work, and it is not a cheap part to replace.
Step 2: Map the Existing Thermostat Wires
Before you open the furnace, photograph the old thermostat baseplate and write down every terminal letter and wire color. You will need this map when you connect the adapter at the furnace, because the adapter's labeled leads must land on the same terminals the thermostat uses.
Step 3: Connect the Adapter at the Furnace Control Board
Open the furnace panel and locate the low-voltage terminal block on the control board. Match the adapter's labeled wires to the same terminals. A typical adapter uses this mapping:
| Adapter Lead | Furnace Terminal | Function |
|---|---|---|
| R | R (or RC/RH) | 24V hot from transformer |
| C | C (or B on some boards) | 24V common return |
| W | W | Heat call |
| Y | Y | Cooling call |
| G | G | Fan call |
Step 4: Wire the New Thermostat Baseplate
Mount the new baseplate and connect the wires to the matching terminals. The adapter effectively creates a C path, so the thermostat's C terminal now has a return. Follow the adapter's wiring diagram exactly, do not improvise terminal assignments.
Step 5: Restore Power and Verify
Restore power at the breaker and service switch. The thermostat should boot within about 30 seconds. If it does not, shut power back off and recheck each terminal for a loose strand or a wire seated under the wrong screw.
| Step | Time Needed | What to Check |
|---|---|---|
| Power off | 5 minutes | Breaker and service switch off, tester confirms dead |
| Wire mapping | 10 minutes | Photo and written terminal list |
| Adapter at furnace | 20 minutes | Terminals match kit diagram, no stray strands |
| Baseplate wiring | 15 minutes | Wires seated and snug under screws |
| Test and verify | 10 minutes | Thermostat powers on, calls heat and cool |
Long-Term Reliability of Power Adapters
Adapters are a permanent fix, not a temporary hack, but they do add one more electronic component between your thermostat and your HVAC system. Adapters run for years without issue when installed per the kit diagram and kept away from the furnace's heat exchanger. Two failure modes are worth knowing: a loose adapter lead can cause intermittent thermostat dropouts, and a failed adapter can leave the system without a call signal.
Repurposing an Unused Wire as a C Wire
Repurposing an unused wire is the cleanest fix when your cable has a spare conductor. Many older thermostat cables contain four or five wires, but only three or four get used.
System Compatibility and Wiring Diagrams
Compatibility checks come before any wiring. Not every smart thermostat works with every HVAC system, and the terminal layout differs between system types. This is the step most generic guides gloss over, and it is where DIY installs most often go wrong.
Heat Pump vs. Gas Furnace Wiring
Heat pump systems use an O/B terminal to switch between heating and cooling. Gas furnaces typically do not. If you wire a heat pump like a furnace, the system may run the wrong mode, heat when you call for cool, or vice versa.
| Terminal | Gas Furnace + AC | Heat Pump |
|---|---|---|
| R / RC / RH | 24V hot | 24V hot |
| C | 24V common | 24V common |
| W | Heat call | Auxiliary/emergency heat |
| Y | Cooling call | Compressor contactor |
| G | Fan call | Fan call |
| O or B | Not used | Reversing valve (O = cool, B = heat) |
| Y2 | Second-stage cooling | Second-stage compressor |
| W2 | Second-stage heat | Second-stage aux heat |
Reading Your Furnace Control Board
Open the furnace or air handler panel and photograph the low-voltage terminal block. The letters on the board are the authority, not the wire colors. In older homes, a previous installer may have used a non-standard color for C, or left a wire disconnected at the board while it was still connected at the thermostat.
Checking Compatibility Before You Buy
Most smart thermostat makers publish a compatibility checker that asks for your system type and terminal letters. Run it before purchase. If your system uses a communicating bus (some high-efficiency variable-speed systems do), a standard smart thermostat may not work at all and you will need the manufacturer's proprietary thermostat or a communicating-compatible model.
When a Wiring Diagram Is Not Enough
If your furnace board has no C terminal, if you see a communicating terminal labeled with two letters, or if the thermostat's compatibility checker returns "not compatible," stop and consult a licensed HVAC technician. Forcing a standard smart thermostat onto a communicating or proprietary system can damage the control board, and control board replacements are among the most expensive HVAC repairs a homeowner can face.
When to Call for Professional Thermostat Installation Services
Professional thermostat installation services make sense when wiring gets unclear. If you see damaged wires, no C terminal, or a control board you do not recognize, stop and call a licensed electrician.
Troubleshooting and Safety After Installation
Common fixes:
- Thermostat blank: check breaker and C wire connection
- System short-cycling: confirm wire gauge and terminal seating
- No cooling: verify Y and G wires match the diagram
- Power stealing issues: some models need a resistor kit, per the manufacturer
For code and safety questions, NFPA electrical safety resources covers low voltage wiring basics.
Frequently Asked Questions
Can I run a smart thermostat without a C wire?
Yes, many smart thermostats work without a C wire by using power stealing, where they draw small amounts of power from other wires. However, this can cause issues like flickering or HVAC system short cycling. For reliable continuous power, a C-wire adapter installation is recommended. Always check your thermostat's compatibility and consider professional help if unsure.
How do I install a smart thermostat with only two wires?
With only two wires (typically R and W for heating-only systems), you cannot directly power most smart thermostats. You'll need a C-wire adapter kit that connects at your furnace control board and provides a common wire. Alternatively, run a new thermostat cable with more conductors. If you're uncomfortable working with low voltage wiring, hire a professional thermostat installation service.
What should I do if my HVAC system has no C wire?
If your HVAC system lacks a C wire, you have three options: use a smart thermostat that doesn't require one (like some models from Nest or Ecobee with adapter kits), repurpose an unused wire in the bundle, or install a C-wire adapter at the furnace. Always turn off power at the circuit breaker before working on wiring. For complex systems, call a licensed electrician.
Is it safe to use a C-wire adapter for my thermostat?
Yes, C-wire adapters are safe when installed correctly. They connect to your furnace control board and provide a common wire without modifying your HVAC system's internal wiring. However, incorrect installation can damage your system or create a shock hazard. Follow the manufacturer's instructions, use proper wire stripping techniques, and if you're unsure, hire a professional.
A missing C wire does not have to stop your smart thermostat upgrade. The right adapter, a spare wire, or a quick compatibility check solves most situations. When wiring gets complicated, Light Life Electric is ready to help. We offer code-compliant installations, 24/7 emergency response, and a team that handles everything from permits to final inspection. Get your free electrical estimate and power your smart home with confidence.